Autocomplete your Rails Form using Selectize.js
Help enhance your user's experience
“Public Transportation Station”:https://www.pexels.com/photo/rails-public-transportation-station-train-station-3849/ by “Charles Forerunner”:https://unsplash.com/@charles_forerunner is licensed under “Creative Commons Zero”:https://www.pexels.com/photo-license/
When using Ruby on Rails Form Helpers, it could be useful to add an autocomplete feature to fields where users might reuse data. An example of this might be a field where it’s likely that a user will reuse an email they used elsewhere in the application. One way this can be accomplished is by using Selectize.js to create a dropdown and populate it with data from the user model.
Setting up Selectize.js
To get started, you need to clone the appropriate files from the Selectize.js repository and add them to the vendor/assets/javascripts directory in your project. Once it is added, we can use the class name, email-autocomplete, to add Selectize.js to the field in CoffeeScript.
app/views/edit.html.erb
<%= f.text_field :email, class: "email-autocomplete" %>
app/assets/javascripts/forms.js.coffee
$(“.email-autocomplete”).selectize(options)
There are many possible options to customize your autocomplete field. Some of these include how many dropdown options are displayed, the HTML for each element, and what fields to search by. It also allows you to specify if the user can create new items. An example of these options would be:
options = {
    maxOptions: 3
    render:
        item: (item, escape) ->
            return "<div class='email-item'><span>#{escape(item.email)}</span></div>"
        option: (item, escape) ->
            return "<div class='email-item'><span>#{escape(item.email)}</span></div>"
    valueField: ‘email’
    searchField: ‘email’
    create: true
}
Dropdown Data
This is all great, but currently there is nothing populating the dropdown. To do this we will return to the view and add the data to the HTML.
<%= form_for @user, html: { data: { account_emails: @user.email_addresses.join(",") } } do |form| %>
From there, we can add the data to the .selectize() options:
options = {
    …
    onInitialize: ->
        emails = this.$input.parents("form").data("account-emails").split(",")

        for email in emails
            this.addOption({email: email})
}
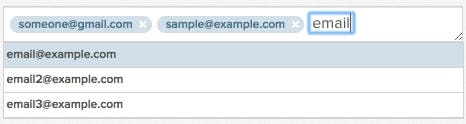
And now you have a nice looking autocomplete dropdown!
Conclusion
There are many things that can be accomplished with Selectize.js. In addition to the variety of options available, there are also plugins that can add functionality like a delete button, or the ability to drag and reorder items. This makes it highly customizable for use in your Rails application, enhancing your user’s experience.
About Victoria Gonda
Victoria is a software developer working on mobile and full stack web applications. She enjoys exchanging knowledge through conference talks and writing.
By
In this article
 Visit
deadmanssnitch.com
Visit
deadmanssnitch.com
Comments
Hey Victoria! I’m trying to do the same, however I can’t manage. Can you post by any chance the whole code (controller, routes, view)?
Cheers!
Andrea
Hi Andrea!
Thanks for the question. I have a gist that includes what I’m doing for my email autocomplete:
https://gist.github.com/vgonda/8ae95f2f754e65f75fa7b4f18c1cedf4
What part of it doesn’t seem to be working for you? I’d be happy to help you out!
Hi Andrea!
Thanks for the question. I have a gist that includes what I’m doing for my email autocomplete:
https://gist.github.com/vgonda/8ae95f2f754e65f75fa7b4f18c1cedf4
What part of it doesn’t seem to be working for you? I’d be happy to help you out!